

Think stretching won’t help your hip pain? Think again.
If your hip feels stiff or locked after sitting, that tightness is likely shortened soft tissue and slower blood flow around the joint.
Gentle, pain-free stretches can loosen those muscles, restore circulation, and stop the catch when you stand or walk.
This routine focuses on small, safe moves you can do on a mat, your bed, or standing by a wall—no force, no sharp pain.
Try these short stretches a few times a day and you’ll often notice less stiffness and smoother steps within days.
Essential Gentle Hip Stretches for Immediate Pain Relief
When you sit for hours and finally stand, does your hip feel locked or achy? That stiffness is soft tissue shortening and blood flow slowing down around your hip joints. Gentle stretching brings movement back to tight muscles, encourages circulation, and helps reset the tension patterns that build up during long periods of sitting, driving, or standing in one position.
The rule is simple. Every stretch stays completely pain free. Move slowly, keep your pelvis stable instead of letting it tilt or rotate, and breathe steadily through your nose. If you feel a sharp pinch, numbness, or pain that radiates down your leg, stop right away and rest.
All you need is a yoga mat, the edge of your bed, or a clear wall space. Lie down or stand wherever feels most stable. Breathe in for three counts, out for four, and let the stretch happen without forcing your body into a deeper range than it’s ready for today.
-
Hip Flexor Stretch — Stand facing a wall with both hands on the surface for support. Place one foot slightly in front of the other, feet shoulder width apart, both planted flat. Shift your weight forward slowly until you feel a gentle pull in the front of your rear hip. Hold 10 to 20 seconds. Repeat five times per day on each side.
-
Seated Figure Four — Sit tall in a chair or on the floor with one ankle crossed over the opposite knee to form the number four. Keep your back straight and breathe. Hold 30 seconds, then switch sides. Repeat three times per side once per day.
-
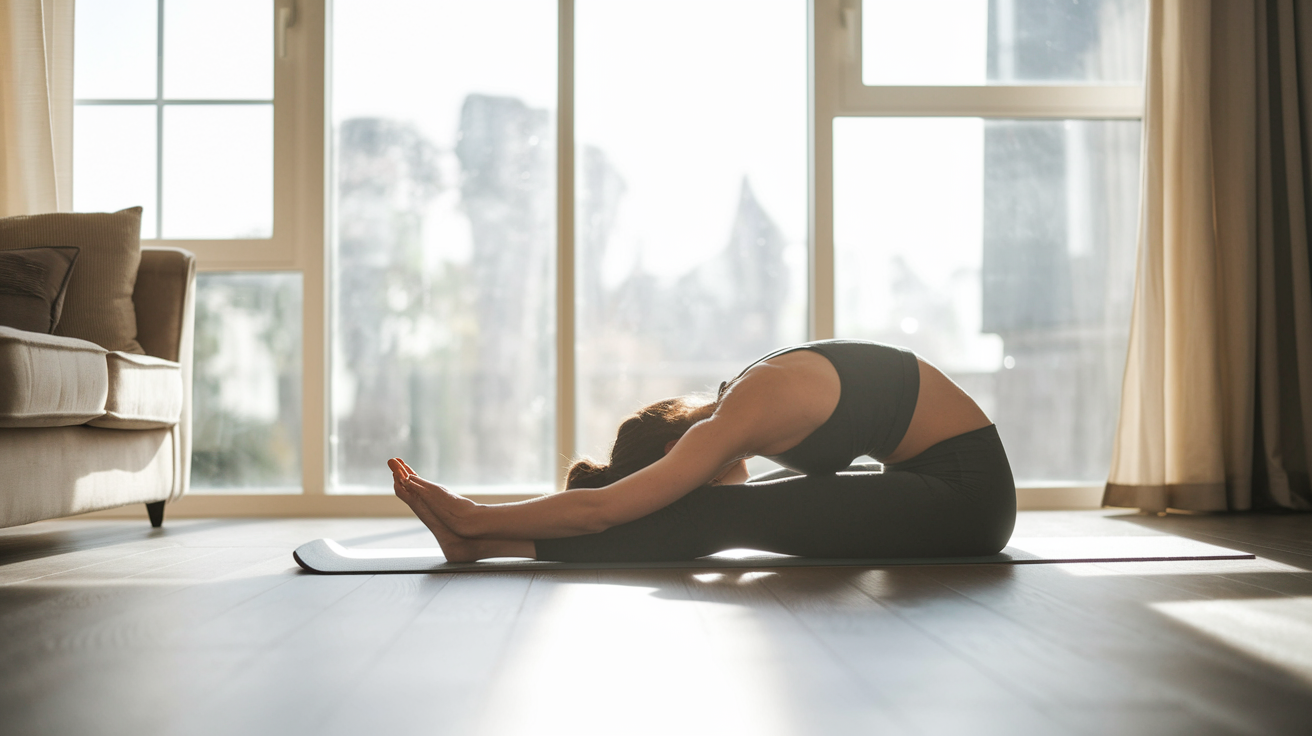
Gentle Piriformis Stretch — Lie on your back, knees bent, feet flat. Cross one ankle over the opposite knee and gently pull the supporting thigh toward your chest until you feel a stretch deep in the glute. Hold 30 seconds. Repeat three times per side once per day.
-
Side Lying Clam — Lie on your side with your hips slightly bent and your knees bent to about 90 degrees. Keep your feet together and your pelvis steady. Slowly open your top knee without letting your pelvis roll back, hold one second at the top, then lower. Perform three sets of 10 reps per day.
-
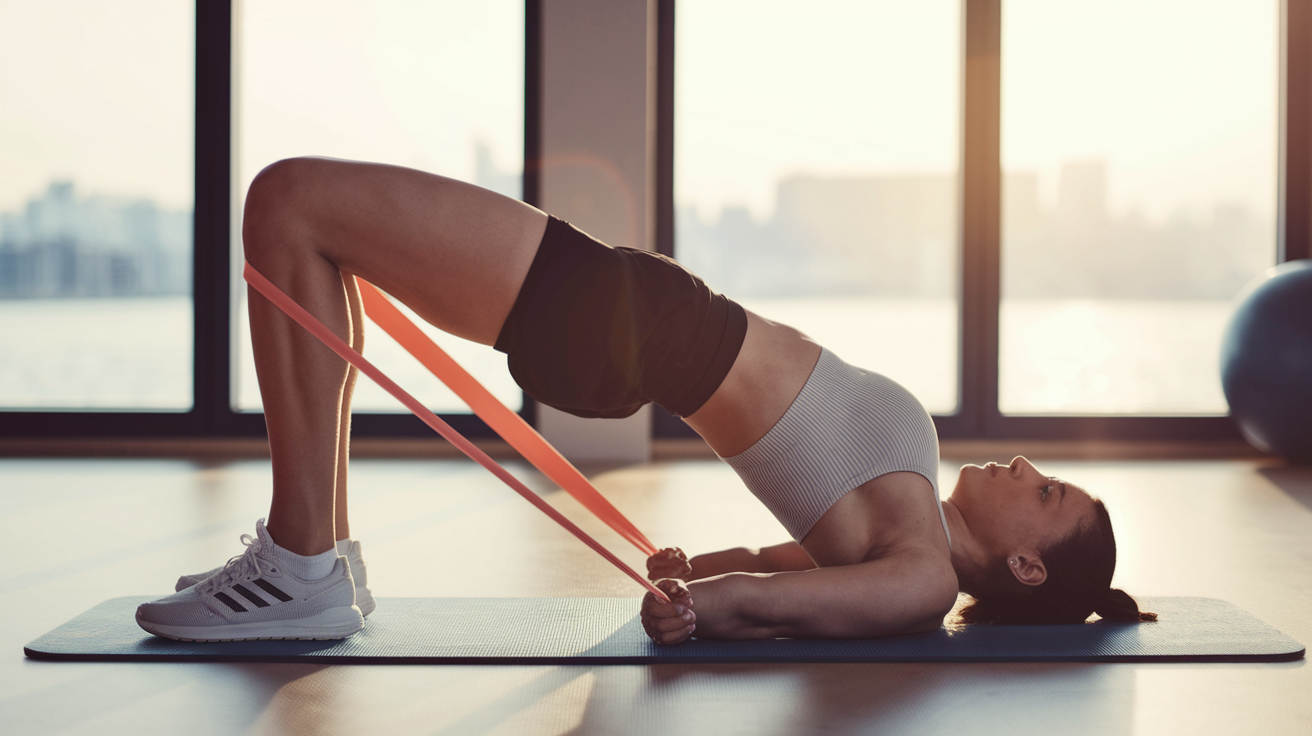
Glute Bridge — Lie on your back, knees bent, feet flat on the floor, hands resting at your sides. Contract your glutes and lift your hips until your knees, hips, and shoulders form a straight line. Hold one second at the top, then lower slowly. Perform as tolerated daily, following demonstrated guidance.
Understanding Hip Flexor Tightness and Helpful Variations
Your hip flexors live at the front of your hip and connect your thigh bone to your lower spine and pelvis. Every time you sit, they shorten. Over weeks and months of desk work, commuting, or evenings on the couch, that shortened position becomes your baseline. When you stand or walk, those muscles can’t lengthen easily anymore, and that tugging sensation shows up as front of hip discomfort or a feeling that your stride is shorter than it used to be.
Adding small variations to the basic hip flexor stretch lets you tailor the move to your body on any given day. If your balance feels shaky or your hip is especially tender, a gentler version keeps you moving without triggering guarding or pain. If you’re ready for a bit more challenge, a harder variation builds stability while still keeping the work gentle and controlled.
Easier variation — Lift your back heel off the floor. This shortens the range and reduces the pull on the front of the hip, helpful on high pain days or when you’re just starting out.
Harder variation — Remove your hand support and place both hands on your hips. This challenges your balance and recruits your core and hip stabilizers more actively.
Wall support option — Stand close to a wall and rest one hand on it for steadiness. This is useful if you feel unsteady or prefer not to rely solely on a countertop or chair.
Alignment cue — Keep your lower back neutral instead of arching. Tuck your tailbone slightly and engage your lower belly to protect your lumbar spine while you stretch.
How Glute and Piriformis Tension Contributes to Hip Pain

Your glutes and the deeper piriformis muscle work together to stabilize your pelvis and control rotation at the hip. When one or both become tight or weak, they can pull unevenly on your hip joint and create a dull ache, a sense of pressure deep in the buttock, or referred discomfort that travels toward your outer thigh or lower back. Prolonged sitting compresses these tissues and reduces blood flow, which is why standing after a long meeting or car ride can feel stiff and uncomfortable.
Gentle activation through small, controlled movements helps reset the tension and reminds these muscles how to support your hip without gripping. You’re not aiming for a hard workout. You’re cueing the muscle to turn on, hold briefly, and release, which improves local circulation and reduces the fatigue that builds when muscles stay passively lengthened or chronically shortened all day.
Safe range means you feel effort but no sharp pain, no pinching in the front or back of your hip, and no sense that your pelvis is twisting or hiking to one side. If the movement feels uneven or your hip clicks, reduce the range and slow down. Frequency matters more than intensity here. Three sets of 10 reps with one second holds, done daily, will give you more benefit than one aggressive session that leaves you sore for three days.
One Optional Piriformis Variation
Reclined figure four offers the same deep glute and piriformis release as the seated version but lets you lie flat with full back support, which can be more comfortable if sitting aggravates your hip. Lie on your back with both knees bent and feet flat on the floor. Cross your right ankle over your left knee. Thread your hands behind your left thigh or shin and gently pull your left leg toward your chest until you feel a stretch deep in your right glute. Keep your head and shoulders relaxed on the mat. Hold 30 seconds, then switch sides. Repeat three times per side once per day.
IT Band and Outer Hip Stretches for Lateral Hip Discomfort
Outer hip pain often shows up as tenderness over the bony point on the side of your hip, achiness that runs down the outside of your thigh, or discomfort when you lie on that side at night. This pattern can come from IT band tightness, hip bursitis, or overactive hip abductors that fatigue from poor alignment or repetitive single leg standing. Gentle lateral stretching reduces the pulling force on the bursa and the outer hip structures, which can calm irritation and improve your ability to walk, climb stairs, or transition from sitting to standing without a sharp catch.
The standing IT band stretch is especially practical because you can do it anywhere you have a wall. It requires minimal setup and gives you immediate feedback. You’ll feel the stretch along the outer thigh and hip of the side closest to the wall, and you can adjust how much you lean to match your tolerance that day.
| Stretch Name | Primary Target | Hold Time & Reps |
|---|---|---|
| Standing IT Band Stretch | Outer hip, IT band, hip abductors | 30 seconds hold, 3 reps per side, once per day |
| Side-Lying Leg Lift (gentle hold) | Hip abductors, outer glutes | Hover 2–3 inches, 10 reps per side, 2–3 times per day |
| Lateral Hip Strengthening (band) | Hip abductors, lateral hip stability | 30-second hold, 10 reps per side, 2–3 times per day |
Seated and Lying Hip Stretches for Limited Mobility Days

Some days your hip hurts too much to stand for a stretch, or your knees won’t tolerate kneeling positions. That’s when seated and lying variations become your go to. You can stretch just as effectively from a chair or your bed. The goal isn’t to match someone else’s range. It’s to gently lengthen tissue, improve local blood flow, and reduce stiffness within your current capacity.
Modifications make stretching accessible on high pain days, during arthritis flares, or for anyone managing balance challenges or joint instability. These adjustments let you keep moving without aggravating symptoms or risking a fall.
Pillow support — Place a small pillow under your knee during lying stretches to reduce pressure on the joint and make the position more comfortable to hold for 30 seconds.
Reduced range — Move only halfway into the stretch. A smaller, pain free range repeated consistently will improve flexibility over time without triggering a protective muscle response.
Strap assisted movements — Loop a towel or yoga strap around your foot during a lying hamstring or hip flexor stretch so you can gently pull your leg closer without straining your hands or shoulders.
Bed option — Perform hip flexor stretches, figure four stretches, and glute bridges directly on your mattress if getting down to the floor and back up feels unsafe or too painful.
Shorter holds — Start with 10 to 15 second holds instead of 30 seconds. You can gradually build hold time as your tolerance improves and your hip begins to relax into the stretch.
Strengthening Principles That Support a Gentle Stretching Routine
Stretching alone reduces tightness, but pairing stretches with gentle strengthening gives your hip the stability it needs to maintain that new range. When muscles are both flexible and strong, they support your joints more evenly, reduce compensation patterns, and lower your risk of re injury. Strengthening doesn’t mean heavy weights or high reps. It means controlled, low load activation that teaches muscles to fire cleanly and hold alignment under small amounts of resistance.
Start with bodyweight only. Focus on quality over quantity. One clean glute bridge with proper alignment, a one second hold at the top, and a slow lower is more valuable than ten sloppy reps that let your pelvis tilt or your knees collapse inward. Side lying leg lifts should hover just two to three inches above your lower leg. That small range, repeated with control, builds endurance in the hip abductors without overloading the joint.
After several days of consistent stretching, you can add a light resistance band to lateral hip exercises. Loop the band around your ankles or just above your knees if the ankle position bothers your knees. Stand with one hand on a wall for support, engage your core, and lift one leg sideways until you feel your outer hip and glute working. Hold for 30 seconds or perform 10 controlled reps per side, two to three times per day. Progress by increasing band resistance or removing hand support once your balance and strength improve.
Simple Progression Framework
Begin with the basic stretches and bodyweight activation exercises for at least one full week before adding resistance or increasing hold times. Once you can complete the routine without soreness or increased pain, extend holds from 10 or 20 seconds to 30 seconds, or add one more set to your daily repetitions. After another week, introduce a light resistance band to your lateral hip work. Increase band tension or remove support aids only when movement quality stays clean and pain free. Progression should feel like a gentle nudge forward, not a test of your pain tolerance.
Safety Guidelines for How to Stretch Hips Safely

Pain free is the baseline. A stretch should create a feeling of gentle tension or mild pulling in the muscle, not sharp, stabbing, or burning pain. If you feel discomfort that makes you hold your breath, clench your jaw, or brace your body, you’ve gone too far. Back off immediately, reduce the range, and try again more gently. Stretching should never leave you limping, swollen, or unable to bear weight comfortably afterward.
Use heat before you stretch if your muscles feel stiff or cold. A warm pack on your hip, buttock, or upper thigh for 10 to 15 minutes increases local blood flow and makes tissues more pliable. After your session, apply ice for 10 to 15 minutes to reduce any mild inflammation or post stretch soreness. This rhythm of heat before, ice after can make stretching more comfortable and help your body recover between sessions.
Stop immediately if you experience sharp, shooting pain that radiates down your leg, into your groin, or deep into your hip joint.
Stop if you notice numbness, tingling, or weakness in your leg or foot during or after stretching.
Stop if pain increases progressively over several sessions instead of improving or staying stable.
Seek professional evaluation if symptoms persist beyond two weeks of consistent, gentle stretching, or if you develop swelling, redness, or significant difficulty walking or standing.
Frequency, Hold Times, and a Sample Daily Hip Stretch Sequence
Most gentle hip stretches benefit from 30 second holds repeated three times per side, performed once per day. Some moves, like the hip flexor stretch, can be held for shorter intervals of 10 to 20 seconds and repeated more frequently throughout the day. The side lying clam is dosed differently because it’s more of an activation exercise, so you’ll perform three sets of 10 reps instead of timed holds. Consistency across the week matters more than perfection in any single session.
A realistic daily sequence takes about 10 to 15 minutes and covers the front, back, and outer hip without overwhelming your schedule or your pain tolerance. You can split the routine into a morning and evening session if a full sequence feels like too much at once. Start with one or two stretches per day, add another every few days, and listen to how your body responds.
Warm up — Apply a heat pack to your hip for 10 minutes or take a warm shower to loosen tissues before you begin.
Hip flexor stretch — 10 to 20 seconds, five repetitions on each side, standing at a wall or countertop for support.
Seated figure four — 30 seconds per side, three repetitions, sitting tall in a sturdy chair.
Side lying clam — Three sets of 10 reps on each side, one second hold at the top of each rep.
Glute bridge — Perform one set of 10 controlled reps with a one second hold at the top of each lift.
Cool down — Apply ice to your hip for 10 minutes to manage any mild soreness and support recovery.
Final Words
Start with the pain-free moves: short hip flexor holds, seated figure-four, gentle piriformis work, side-lying clams, and glute bridges — all slow, steady, and with relaxed breathing.
Keep safety front and center: stop if pain spikes, use a wall or bed for support on rough days, and add gentle strengthening after a few days. Aim for short daily sessions and heat before stretching if it helps.
Try this gentle stretching routine for hip pain for the next week—two short sessions a day or one 15-minute flow. Small, consistent steps add up, and you’ll likely feel more mobile and stable.
FAQ
Q: What gentle hip stretches can I start right now and how long should I hold them?
A: The gentle hip stretches you can start right now are hip flexor stretch (10–20s, 5 reps), seated figure four (30s, 3 reps), piriformis, side‑lying clam (3×10, 1s hold), glute bridge (1s hold).
Q: How often should I do hip stretches each day?
A: The frequency is daily: aim for once a day to start. Common patterns: 30‑second stretches 3 reps, hip flexor 5 reps/day, and side‑lying clams 3×10/day as tolerated.
Q: How do I stretch my hip flexors safely and what variations help?
A: To stretch hip flexors safely, use a split stance with hands on support, shift forward gently, hold 30 seconds, 3 reps per side; easier: lift back heel; harder: hands off support to challenge balance.
Q: How do glute and piriformis tightness cause hip pain and what can I do about it?
A: Glute and piriformis tightness can press on deep hip tissues and nerves, causing dull or sharp discomfort; gentle activation like bridges and figure‑four stretches plus short holds and daily reps help reduce tension.
Q: What should I do on limited mobility or high‑pain days?
A: On limited mobility or high‑pain days, choose seated or lying options, shorten ranges and holds, use pillows or bed support, and do gentle movements only—stop if pain increases and rest as needed.
Q: How do I safely stretch my hips and when should I stop?
A: To stretch hips safely, keep movements pain‑free, move slowly, keep a stable pelvis, and use heat before and ice after; stop immediately if you feel sharp pain, numbness, or new weakness.
Q: How should I set up and breathe during hip stretches?
A: For setup and breathing, use a mat, bed, or wall for support; keep hips level, breathe slowly into the stretch for three to five deep breaths, and exhale as you relax deeper.
Q: When should I add strengthening or resistance to my hip routine?
A: Add strengthening after several days of consistent, pain‑free stretching; start with bodyweight progressions, then add bands for resistance, increasing reps or range before adding weight.
Q: Will these stretches help outer‑hip pain, like IT band or bursitis?
A: These stretches often ease outer‑hip pain by reducing tension; a standing IT band lean (30 seconds, 3 reps) and gentle lateral moves can relieve bursitis symptoms when done pain‑free.
